Thursday, August 27, 2009

Photobucket Makes Me Angry

Why? Well, it seems that their former unlimited space for all users is now limited, and they've also decided to get rid of the old uploader function, which was the only one that I could use easily. The files on my camera are .JPGs, whereas photobucket only recognizes .jpgs... And their new uploading window comes up much wider than my screen.

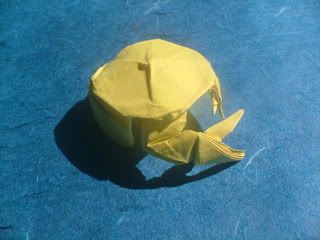
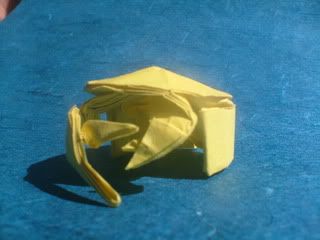
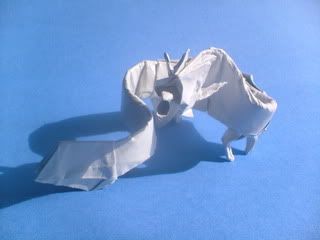
Anyways, enough of that. I did manage top upload the pictures of my latest model, a fiddler crab, based on Brian Chan's model. Yes, another submission for the Complex model in less than 30 steps challenge. It seems that I had missed something in the rules, and step doesn't mean step for this challenge, so I had to withdraw my Ryuzin. Anyways, this abides by the rules and I based the legs on the legs of another contestant's scorpion. It actually doesn't have legs, just a supporting strip where the legs would be. Here is my CP:
Fiddler Crab CP

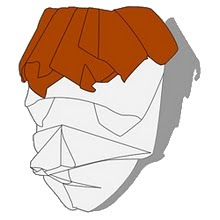
The claw section is pretty straight forward, all it needs is a bit of thinning and shaping. For the body, you can fold out the flaps on either side underneath and then shorten the length to make the legs. A bit of rounding a a pleat to make it a bit more 3D, and you end up with this:
Fiddler Crab, Ryan MacDonell
Photobucket

Tuesday, August 18, 2009

Squashed Like a Bug

As mentioned in the previous post, the challenge this month is to fold a complex model in less than 30 steps. For my next model, I chose to try and fold a Samurai Helmet Beetle, based on the many models of the beetle that have been folded. I used Robert Lang's model for reference. My ideas started off with some simple pleats to make the elytra and the scutellum (the triangle) on the abdomen. After that, I figured out how to make the small and large horns, and up to that point the model was all flat. I figured that I would make it 3D when I added the legs, but I found a way to make the legs flat. I liked the result quite a bit, despite it not being how I intended it to be. Here the is the somewhat complicated CP:
Samurai Helmet Beetle CP

From the CP, you can see where the abdomen, thorax and horns come from. The smaller horns are just above the middle of the square. When you fold back the edges to make the two points, you can squash the underside part and then open it up to get eyes. You can sort of see them in the picture. The legs come from folding out the visible pleats. The forelegs are just valley folds, but the hind legs are each pleats, starting from under the body. The large horns are fairly easy to fold into shape, just by flattening the very top middle section, then thinning the long connector between the horns and the body. After you're done with the details, its best to fold the side and top edges behind to lock the pleats for the legs and horns. Also, where the pleats and on the bottom edge can be locked with small 45° angle folds.
Samurai Helmet Beetle, Ryan MacDonell

Wednesday, August 12, 2009

Based On...

I found the challenge this month on the english origami forum very interesting. This month, the challenge is Complex model in less than 30 steps. That means pick any model such as one by Kamiya, Lang or Takashi and fold an interpretation of it in 30 steps. I chose 3 models to try out, and the first with a result was Ryuzin, based on Kamiya Satoshi's Ryuzin 3.5. I wanted a lot of details, and just ended up with a really thick model. Here is the CP, which gives you an idea of the thickness of the middle.
Ryuzin CP

It can be diagrammed in 30 steps or under, what with all of the repetitions. To start off, pleat the corners into the middle so that the paper is a quarter of the width (diagonally). You can see that the outside parts are just repeated. Fold the CP for the middle. For the feet, pleat them into the middle. The head and tail details are fairly straightforward, and you can choose to make a tongue, too.
Ryuzin, Ryan MacDonell

Saturday, August 8, 2009

Three Rivers

I've been thinking of folding this for a while, but didn't really know where to start. It turned out to be really simple! I decided while I was there to fold the Trois-Rivières seal, which is quite simply three rivers going into water. I would have liked to have folded every part of the symbol, but I'm still happy with what I got. Here is what I mean:
Trois-Rivières Seal, Ryan MacDonell

As compared to the actual seal:


Theres quite a bit of difference, but thats okay. To fold it, start with a preliminary base with the open corner facing top left. Fold one edge to the top right-hand corner, and then fold the two of the edges from the top right into the shape of the rivers. It should take up about a quarter of the space on the preliminary base. Fold the colorchanges, and then refold the rivers. Fold the excess paper behind, and you should end up with a seal! Good luck!

Wednesday, August 5, 2009

5 weeks of fun

I was sitting in someones room and I asked one of my friends what I should fold, and thats what they asked for. It worked out well, because I came up with the basic design in about 30 seconds. I ended up using a really simple CP, that looks something like this: Kangaroo CP 
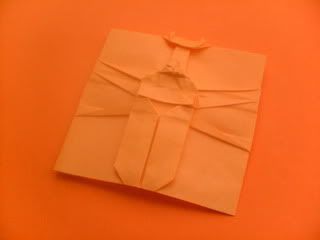
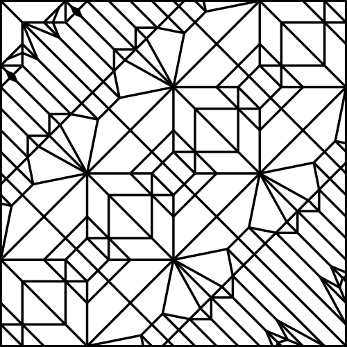
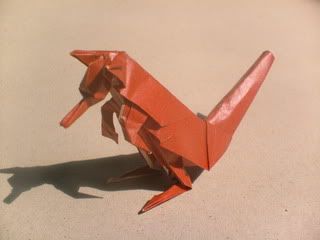
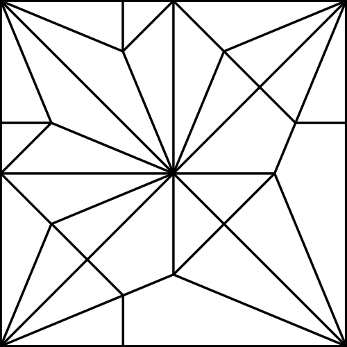
As you can see, it is very simple and I guarantee that I have seen the CP somewhere before. After folding the base, thin the entire sections on either side of the arms with rabbit-ear folds. Shorten the tail and inside reverse fold it, and then just add the details. The kangaroo should end up something like this one:
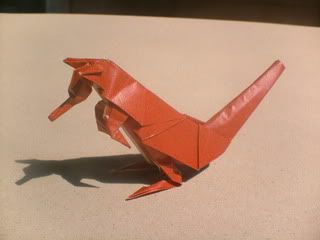
 Kangaroo, Ryan MacDonell Kangaroo, Ryan MacDonell